How to install a Samsung Bespoke AI Vented Laundry Combo

How to install a Samsung Bespoke AI Vented Laundry Combo
Installation precautions
Before you begin installing your Bespoke AI Laundry Combo, it’s a good idea to review the following safety tips and precautions. For more information, please consult your user manual.
- We recommend asking a friend to help when unpacking the unit and its contents.
- All packaging materials should be removed before installation.
- Do not lay the unit on the floor; always keep it in an upright position.
- Do not tip over the unit or install it at a 45 degree angle. This is to prevent oil getting into the sealed system.
- If the unit is accidentally tipped over on its side for an amount of time, we recommend waiting the same amount of time before connecting the unit to a power source, or you may risk damaging the unit. This is because the refrigerant lines will absorb the oil, and the unit will not heat.
- The unit should be installed on a solid, flat floor and away from direct sunlight and heat sources.
Prepare your laundry room
Prepare your laundry room, closet, utility room, or wherever your Bespoke AI Laundry Combo unit will be located, so it’s ready to go. Keep the following in mind when preparing your desired space:
- Measure the space to make sure your unit fits and is not blocking something else, such as a door.
- A firm, level surface without carpeting or slippery flooring is recommended. The unit should not be able to slide around on the floor. This may cause unbalanced load errors.
- The ambient temperature should be higher than freezing (32 degrees).
- Adequate space for ventilation, wiring, water supply hoses, and the drain hose is required, as well as space for the door to open freely.
Required tools

Check the list below to make sure you have all the necessary installation tools.
- New water hoses
- Phillips screwdriver
- Level
- Adjustable pliers
- Measuring tape
1. Remove the shipping bolts
After unpacking your Bespoke AI Laundry Combo unit, you must remove the shipping bolts.

- Loosen all shipping bolts on the rear of the unit with the supplied wrench.
- Fill the holes with the supplied plastic bolt caps.
Note: Keep the shipping bolts and spacers if you ever decide to move the unit.
- Close the plastic bolt caps.
2. Level the unit
Once the unit is in the desired position, you can level it.

- Place both hands on either side of the unit, and then try to gently rock it back and forth. If it rocks in any direction, turn the leveling feet clockwise to lower it or counterclockwise to raise it. You can use the supplied wrench to adjust the leveling feet.
- Once the unit is leveled, tighten the locking nut on each leg with a screwdriver until they are flush against the bottom of the unit. This will lock each leg at its current setting and maximize the length of time before it needs to be leveled again. When you're done, make sure all feet are making contact with the floor.
3. Connect the exhaust system
- Clean all old ducts before installing the Laundry Combo, and make sure the vent flap opens and closes freely.
Note: We recommend that you clean the exhaust system annually at a minimum. - Make sure the Laundry Combo is installed properly so the air exhausts freely.
- Use 4-inch rigid metal ducts. Tape all joints including the combo connection.
- Keep the ducts as straight as possible to facilitate venting.
4. Connect the electrical wiring (for electric models)
- Loosen or remove the screws from the center terminal block.
- Connect the neutral wire (white or center wire) of the power cable to the center, silver-colored terminal screw of the terminal block, and then tighten the screws.
- Connect the other wires to the outer terminal block screws, and then tighten those screws.
- Tighten the strain relief screws.
- Insert the terminal block cover into the rear panel of the Laundry Combo. Then, secure the cover with a hold-down screw.
- Remove the external ground connector’s screw and connect the ground wire (green or unwrapped) of the power cable to the screw.
- Loosen or remove the screws from the center terminal block.
- Connect the neutral wire (white or center wire) and ground wire (white) to the center screw of the terminal block. Tighten the screw.
- Connect the other wires to the outer terminal block screws. Tighten the screws.
- Tighten the strain relief screws.
- Insert the tab of the terminal block cover into the rear slot of the Laundry Combo. Secure the cover with a hold-down screw.
5. Connect the water supply hoses
- First make sure there is 5 inches of space between the back of the laundry combo and the wall to prevent water hoses from getting kinked, which could lead to a water leak.
- Attach the water hoses to the hot and cold water taps, and then hand tighten the water hose fittings until they are snug.
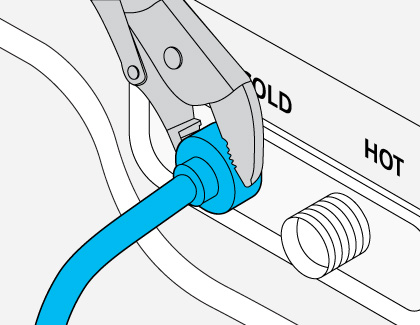
- Use pliers to tighten the fittings by an additional two-thirds of a turn. To avoid damaging the fittings, do not overtighten them.

- Pull the water hoses slightly to check if they are firmly connected.
- Put the other ends of the hoses into a bucket, and then open the water taps for 10 to 15 seconds to remove impurities. When done, close the taps.
- Attach the water hoses to the hot and cold water inlets on the back of the laundry combo, and then hand tighten the water hose fittings until they are snug. If you do not want to use the hot water supply hose, attach the water intake cap to the hot water supply intake. When you do a wash, tap Temp. and select Tap Cold.
- Use pliers to tighten the fittings by an additional two-thirds of a turn.
- Open the water taps, and check for any leaks.
Using the short hose as an extension
- Close the water tap. If you have a washer's water hose attached to the water tap, unscrew and remove the hose.
- Connect the short hose to the water tap. Turn the coupling by hand until it is snug.
- Using pliers, tighten the coupling an additional twothirds turn. Do not overtighten or you may damage the coupling.
- Connect the Y-connector to the end of the short hose. Turn the coupling by hand until it is snug.
- Using pliers, tighten the coupling an additional twothirds turn. Do not overtighten or you may damage the coupling.
- Connect the water hoses to the filling valve at the top rear of the washer. Turn the coupling by hand until it's tight.
- Tighten the coupling an additional two-thirds turn using pliers being careful not to overtighten.
- If you detached the water hose from your washer, attach the hose to the free end of the Y-connector, and then tighten the coupling by hand until it's snug.
- Tighten the coupling an additional two-thirds turn using pliers being careful not to overtighten.
- Open the water tap, and check for any leaks.
6. Connect the drain hose
Connect to a laundry tub or drain pipe
Your drain system must meet the minimum and maximum height requirements.
Minimum height: 18 inches (46 centimeters)
Maximum height: 96 inches (245 centimeters)
- Measure the height from the floor where the combo is placed. To prevent the combo from siphoning water, do not use a drain system below minimum height.
- Attach the drain hose to the plastic hose guide provided with your laundry combo.
- Route the drain hose to the drain system. If using a standpipe, make sure it and the drain hose connection is not airtight, and make sure the drain hose is inserted at least 6 inches but no more than 8 inches into the standpipe.
Note: The minimum diameter of the standpipe must be 2 inches if the laundry combo is installed with another washer. - Secure the drain hose with cable ties.
Over the edge of a wash basin
- Measure to make sure the hose is placed no lower than 24 inches and no higher than 35 inches from the floor.
- To keep the spout of the drain hose bent, use the supplied plastic hose guide and secure the guide to the wall using a hook to ensure stable drainage.
7. Power on and set up the unit
- Plug the power cord into an approved electrical outlet, and then tap the Power icon to turn on the combo.
- Follow the on-screen prompts to select your language and complete a tutorial of the unit's screen navigation.
8. Run a vent blockage test
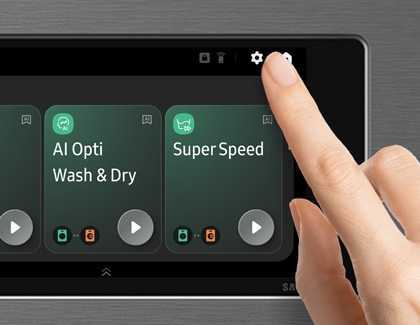
- Make sure the drum is empty and the door is closed, and then tap Settings.

- Tap Washer, and then tap Vent Blockage Test.
- Tap Start test. The test takes about two minutes and will show Testing... on the display until it's complete.
- After the test, the results will be displayed on the screen. If there are no issues, you should see No problems detected. If an information code displays, review the user manual to see what the code means.
9. Calibrate the laundry combo
Calibrating the unit ensures accurate weight detection of your laundry load.
- Make sure the drum is empty and close the door.
- Tap the Power icon to turn on the unit if it is off.
- Tap Settings, Washer, Calibration.
- Tap Start Calibration.


Contact Samsung Support


