Galaxy Z Flip7 and Flip7 FE FlexCam and other camera features

Galaxy Z Flip7 and Flip7 FE FlexCam and other camera features
Camera specs

With the high-resolution camera on the Galaxy Z Flip7 and Z Flip7 FE, you can capture vivid details in all lighting conditions, ensuring memorable moments are preserved with clarity and precision..
Cover Screen Camera
- 50MP Wide AF OIS lens
- 12MP Ultra Wide lens
- 10x Digital zoom
- 4K video recording at 60fps
Main Screen camera
- 10 MP Main Screen lens
- 4K video recording at 60fps
High-Res 50MP Camera and Nightography
50MP High-resolution photos
Here’s a detailed breakdown of capturing a 50MP photo on your Galaxy Z Flip7 or Flip7 FE:
- Open the Camera app on your phone.
- Tap Photo mode below the viewfinder.
- Tap the current Resolution (12M) located next to the Flash icon, and then tap 50M.
- When you're ready, tap the Capture button (the white circle) to take the high-resolution photo.
10-bit HDR
To record 10-bit HDR videos, make sure HDR is turned on. Here's how:
- Open the Camera app on your phone.
- Tap the Quick controls icon (the four white circles forming a square), and then tap the Settings icon.
- Tap Advanced video options under Videos.
- Tap the switch next to HDR to turn it on.
10-bit HDR videos may not play on non-compatible devices, but they can be converted on your phone for playback on most devices. Here's how:
- Open the Gallery app on your phone.
- Select your 10-bit HDR video, and then tap the Edit icon (the pencil).
- Tap the More options icon (the three vertical dots).
- Tap Size and format, and then choose your desired resolution.
- Tap HDR (looks better) in the Video format section, and then tap SDR (plays on any device)
- Tap Done, and then tap Save to convert the video.
Use FlexCam shooting modes
The FlexCam offers three shooting modes on the Cover screen. Once the FlexCam is open, you can swipe left and right to select a mode. Portrait and Photo modes are compatible with Nightography, which means you’ll still get bright and clear photos at night.
The following modes are available:
- PORTRAIT: Take a quick selfie using Portrait mode. Tap the filters icon (the circle) to select a filter and tap the Quick controls icon (the four dots) to configure settings.
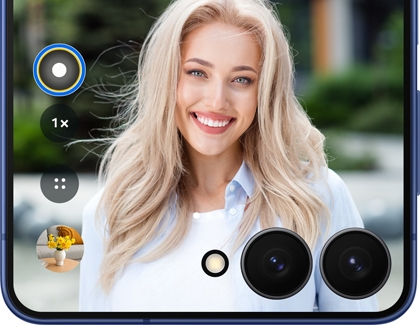
- PHOTO: Take a quick photo of yourself or your friends. Tap the auto zoom icon (it looks like two people) to turn the zoom on or off.
- VIDEO: Film a video using the Cover screen. Tap the zoom icon (the number) to adjust the zoom and tap the Quick controls icon (the four dots) to configure settings.
While in Flex Mode, you can use your Z Flip7 or Z Flip7 FE like a camcorder when shooting videos in landscape mode.
- Navigate to and open the Camera app, and then tap VIDEO.
- Make sure you’re using the rear camera lens. You can swipe up or down on the screen to switch between the front and rear cameras.
- Next, hold the phone on its side using one hand so you can easily access the controls while filming.
- Tap the Record icon to start recording with one hand.
Note: If the Flex mode panel is enabled, the Camera controls will only be available when the phone isn't positioned horizontally.
Use Auto zoom
Auto zoom
- Double press the Power button to launch the FlexCam.
- Select PHOTO as your shooting mode. Auto zoom will be on by default when using this mode.
- Fold your phone to launch Flex Mode, and then place the phone on a flat surface.
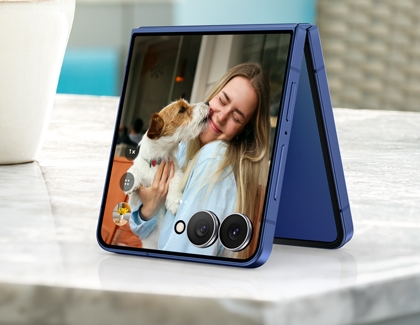
- The FlexCam will follow your movements and zoom in and out.
- To capture a hands-free photo, show the palm of your hand to initiate the shutter. You can also use voice commands if desired. Please see the “Access and adjust Camera settings” section for more details.
Photo and video modes
The following shooting modes are available on your Galaxy Z Flip7 or Z Flip7 FE:
- Photo: Take photos and allow the camera to determine the ideal settings for pictures.
- Video: Record videos and allow the camera to determine the ideal settings for videos.
- Portrait: Add and adjust background effects for photos.
- More: Choose other available shooting modes.
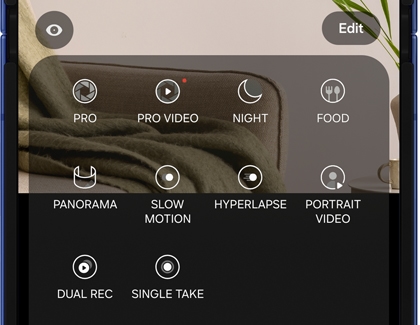
- Pro: Manually adjust the ISO sensitivity, exposure value, white balance, and color tone while taking pictures.
- Pro Video: Manually adjust the ISO sensitivity, exposure value, white balance, color tone, and microphone sound options while recording videos.
- Night: Use this to take photos in low-light conditions without using the flash.
- Food: Take pictures that emphasize the vivid colors of food.
- Panorama: Create a linear image by taking pictures in either a horizontal or vertical direction.
- Slow Motion: Record videos at a high frame rate for viewing in slow motion.
- Hyperlapse: Create a time lapse video by recording at various frame rates. The frame rate is adjusted depending on the scene being recorded and the movement of the device.
- Portrait Video: Add and adjust background effects for videos.
- Dual Recording: Record video using two camera lenses at once.
- Single Take: Capture multiple pictures and video clips from different angles.
- Bixby Vision: Use Bixby Vision features, such as Discover and Scene Describer.
Access and adjust Camera settings
To find the Camera settings on your Galaxy Z Flip7 or Z Flip7 FE, open the Camera app, then tap the Quick controls icon (the four dots), and then tap the Settings icon.

The following will be available:
Intelligent features
- Scan documents and text: Automatically show a button when a document is detected to scan it. You can enable Auto scan, which will scan a document without a tap, or remove unwanted objects, just in case your fingers are in the frame.
- Scan QR codes: Automatically detects QR codes when using the camera.
- Shot suggestions: Get on-screen guides to help you line up great shots.
- Intelligent optimization: Set the quality optimization options to prioritize the quality or speed of Photo mode. You can also enable Scene optimizer to automatically optimize the color and contrast. The Scene optimizer is only available when using the rear camera.
Pictures
- Swipe Shutter button to: Choose to either take a burst shot or create a GIF when you swipe the shutter to the nearest edge.
- Watermark: Place a watermark on your photos. You can select the information included in the watermark as well.
- Advanced picture options: You can choose to save images in HEIF, RAW, or JPEG formats.
Selfies
- Save selfies as previewed: Save selfies as they appear in the preview without flipping them.
- Swipe up/down to switch cameras: Switch between the front and rear cameras with just a swipe.
Videos
- Auto FPS: Automatically record brighter videos in low-light conditions by optimizing the frame rate.
- Video stabilization: Activate anti-shake to keep the focus steady when the camera is moving.
- Advanced video options: Enhance your videos with advanced recording formats. Available options include High efficiency videos, High bitrate videos, HDR, and 360 audio recording.
Capture for VR
- 3D capture: Take high-depth spatial photos and videos that can be enjoyed in 3D using a VR headset.
General
- Fit to screen (3:4 ratio): Remove the black bars around the preview on the main screen when using Flex mode.
- Tracking auto-focus: Keep moving subjects in focus.
- Composition guide: Display viewfinder grid lines to help compose a picture or video.
- Location tags: Attach a GPS location tag to your pictures and videos.
- Shooting methods: There are a few different methods you can choose from and enable, such as Press Volume buttons to, Voice commands, Floating Shutter button, and Show palm.
- Settings to keep: Choose whether to use the same shooting mode, selfie angle, and filters as the last time.
- Shutter sound: Play a tone when taking a picture.
- Vibration feedback: Enable vibrations when tapping the screen in the Camera app.
Privacy
- Permissions: View the Camera's permissions.
- Reset settings: Reset the Camera’s settings.
- About Camera: View app and software information.
Use Galaxy AI editing tools
- Galaxy AI basic features provided by Samsung are free. Any Samsung enhanced AI features and all third party AI features are subject to different terms and may be subject to fees. (Galaxy AI basic features are listed under "Advanced intelligence" in Samsung Services Terms and Conditions.)
- Galaxy AI photo editing requires a Samsung account login and internet connection. Editing with Generative Edit results in a resized photo up to 12MP.
Generative Edit
- Open the Gallery app, and then select a photo.
- Tap the Photo Assist icon (the stars).
- Tap or draw around an object in the photo you’d like to adjust. Then, touch and hold the object, and drag it to another part of the photo.
- Tap Generate to use Generative Edit, which will fill in the photo’s missing parts.
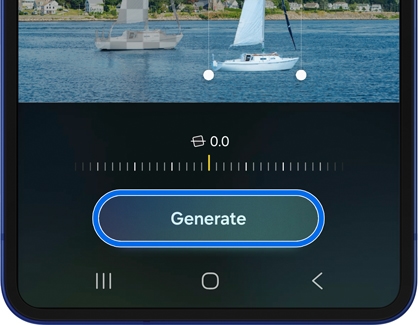
- Touch and hold View original to compare the versions. When you’re finished, tap Save copy.
AI drawing
- Open the Gallery app, and then select a photo.
- Tap the Photo Assist icon (the stars).
- Swipe to Sketch to image and then use your finger to draw something on the photo, such as a shape.
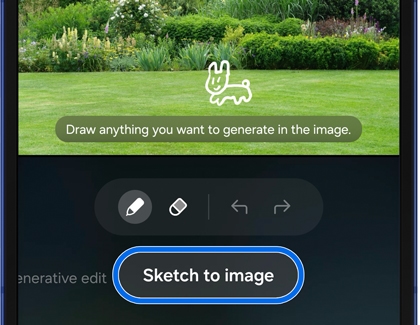
- Tap Generate; the sketch will be transformed and added to your photo.
- Swipe left to view the generated sketch. Swipe left again and tap Generate one more to generate another sketch.
- Tap Save copy underneath your preferred image to save the new photo.
Edit suggestion
- Navigate to and open the Gallery app, and then select a picture you'd like to edit.
- Swipe up on the image to view the available edit suggestions. For instance, you may see options for Remaster, Erase shadows, or Erase reflections.
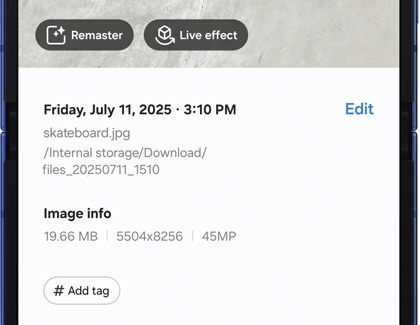
- Select your desired suggestion and then follow the instructions to apply the changes. You may need to tap or draw around objects or adjust a slider bar.
Portrait Studio
- Open the Gallery app and then find and select your desired selfie.
- Tap the Photo Assist icon (the stars), and then swipe to Portrait studio.
- Select from the available styles at the bottom of the screen, such as Comic, 3D cartoon, or Watercolor.
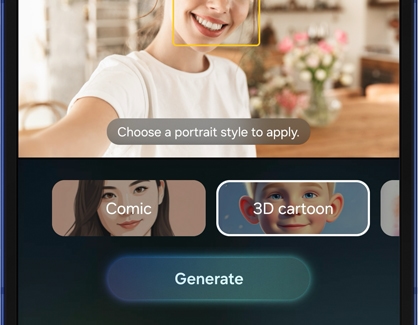
- Then, tap Generate.
- You’ll see the newly generated image. Swipe left and tap Generate one more to generate another image.
- Tap Save copy underneath your preferred image to save the new photo.
Live Effect
- Open the Gallery app and then find and select a photo.
- Swipe up to view more details, and then tap Live effect on the image.
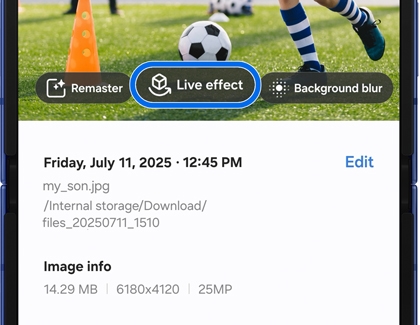
- AI will generate the photo’s effects. You may see a zooming motion, a panning motion, or a swivel motion.
- You can share the generated photo by tapping Share at the bottom of the screen.
- Tap Save copy to save the image.
Audio Eraser
To edit audio of a video using Audio eraser, follow these steps:
- Open the Gallery app on your phone, and then select your desired video.
- Tap Edit (the pencil icon), then tap Audio (the speaker icon) on the bottom right.
- Tap Audio eraser and choose an audio option, such as Voices, Music, Noise, Crowd, or Nature, to remove it from the video.
Note: Short sounds may not be detected, and similar-sounding noises might be misidentified. - Tap the Play icon to preview the changes.
- Tap Hear original in the top left to hear the original audio.
- Tap Auto in the bottom right to view the noise levels or tap Mute to silence the audio.
- Once you're done, tap Apply edits, and then tap Save copy to save your edited video to the Gallery app.


Contact Samsung Support

